Faculty: We are asking you to curate your scholarly activities in Elements. For background, please see below, but here is a summary of the steps we are asking you to take.
- Log into Elements and update your profile and research identifiers so that Elements can harvest data on your scholarship from its online sources. Then wait until the next morning after Elements has re-run its harvest using your new information.
- Review and claim your scholarly activity (and sponsored project activity if relevant).
- If there are missing items, use the manual entry process to add them (note: if there are a lot of missing items, we’ll want you to ask for help in case we can fix the program through step a.).
Who does this apply to? This message is specifically for faculty in CAS-NS, CAS-SS, LCB, LAW, COE, Ballmer, KCASI, and Libraries because we believe Elements will be able to automatically harvest most scholarly activities of people in these units. We expect to then include other units with faculty next year. For faculty who receive this message, we will also follow up in spring with instructions on curating teaching and service activities in Elements. The goal is to have this data up to date before Fall 2026, so that it can be used internally to UO for the 2026-2027 review cycle.
Background: In AY25-26, UO implemented the use of a digital system, Elements, for faculty reviews. As part of this implementation, faculty activity data and profile information have been pre-populated on behalf of faculty from internal UO sources (e.g., Banner, OVPRI’s grant tracking) and external databases. Now that data has been imported, and most faculty CV’s have been at least partially transcribed in the system, we are asking faculty to log into Elements and complete a handful of action items, summarized above. You can start and finish most tasks within a few minutes, and you can always come back into the system and continue where you left off. The goal is to capture your activities in Elements for the 2026-2027 review cycles onward, so focus on the period for your next review. You are more than welcome to put the entirety of your work into Elements; however, this request is for the review periods needed for upcoming major reviews. Note: some units may be running annual reviews or performance evaluations in the system in Winter/Spring 2026 and will provide additional instructions to their faculty. Links to our instructional web content, our training videos, and our guidance materials are below. Are you still unsure how to do something in Elements or you would like extra help from OtP? Attend one of our faculty-focused trainings or schedule a training for your entire unit.
FACULTY ACTION ITEMS (AY26-27 Reviews)
- Getting Started (see our homepage tour and walk through the steps below).
- Log into Elements (https://uo.elements.symplectic.org/).
- Edit your profile including your email address, pronouns, preferred name, and account settings.
- Update your research identifiers including ORCiD.
- You may also want to fine tune your search settings for scholarly and grant databases. You can do so using keywords and name variants.
- NOTES: You can also review these action items on your to-do list under My Actions. For activities, focus on your REVIEW PERIOD. You are more than welcome to add content from your previous review cycles or your entire CV contents to Elements, but you are only required to include entries relevant to your review period.
- Review and claim your scholarly activity (let a day elapse after step 1 so that Elements has an opportunity to use your updated profile and research identifiers to harvest publications that should be attributed to you).
- Autoclaim and reject anything that might not be relevant to you
- Review any entries that have been made from your CV or harvested from databases.
- Need to edit any entries in scholarly activity? Use our step-by-step easy edit process.
- Need to add anything for your review period into the system? Here’s our scholarly activity guidance.
- Also, use our written instructions or watch a brief training video to add content to Elements.
- Review and revise any of your sponsored project activity.
- Review the sponsored project types and your sponsored project entries.
- Edit any sponsored project activity.
- Some data in sponsored projects is locked and requires an IT ticket submission so that we can correct the source data.
- Add any new entries to sponsored projects such as fellowships. Watch our quick video or review our written help on this topic.
WATCH LOGGING IN TUTORIAL VIDEO
- Go to uo.elements.symplectic.org
- You will be redirected to UO’s single sign-on (SSO)
- Provide your UO credentials (this includes a Duo mobile push)
- You can now see your customized Elements homepage

On the left, you will find the expandable menu. The top center carousel (customizable to list view if preferred) will show “My Actions,” such as claiming your scholarly activities, starting your review, adding your ORCiD, etc.
Clicking on the question mark on the bottom of the menu bar will take you to a “Help” screen with links to the UO Elements Support ticketing site. You will also see a link to a Quick-Start Guide that takes you through the basic steps of adding to your profile, claiming scholarly activities, and refining your search settings to help Elements pull in more of your scholarly work.
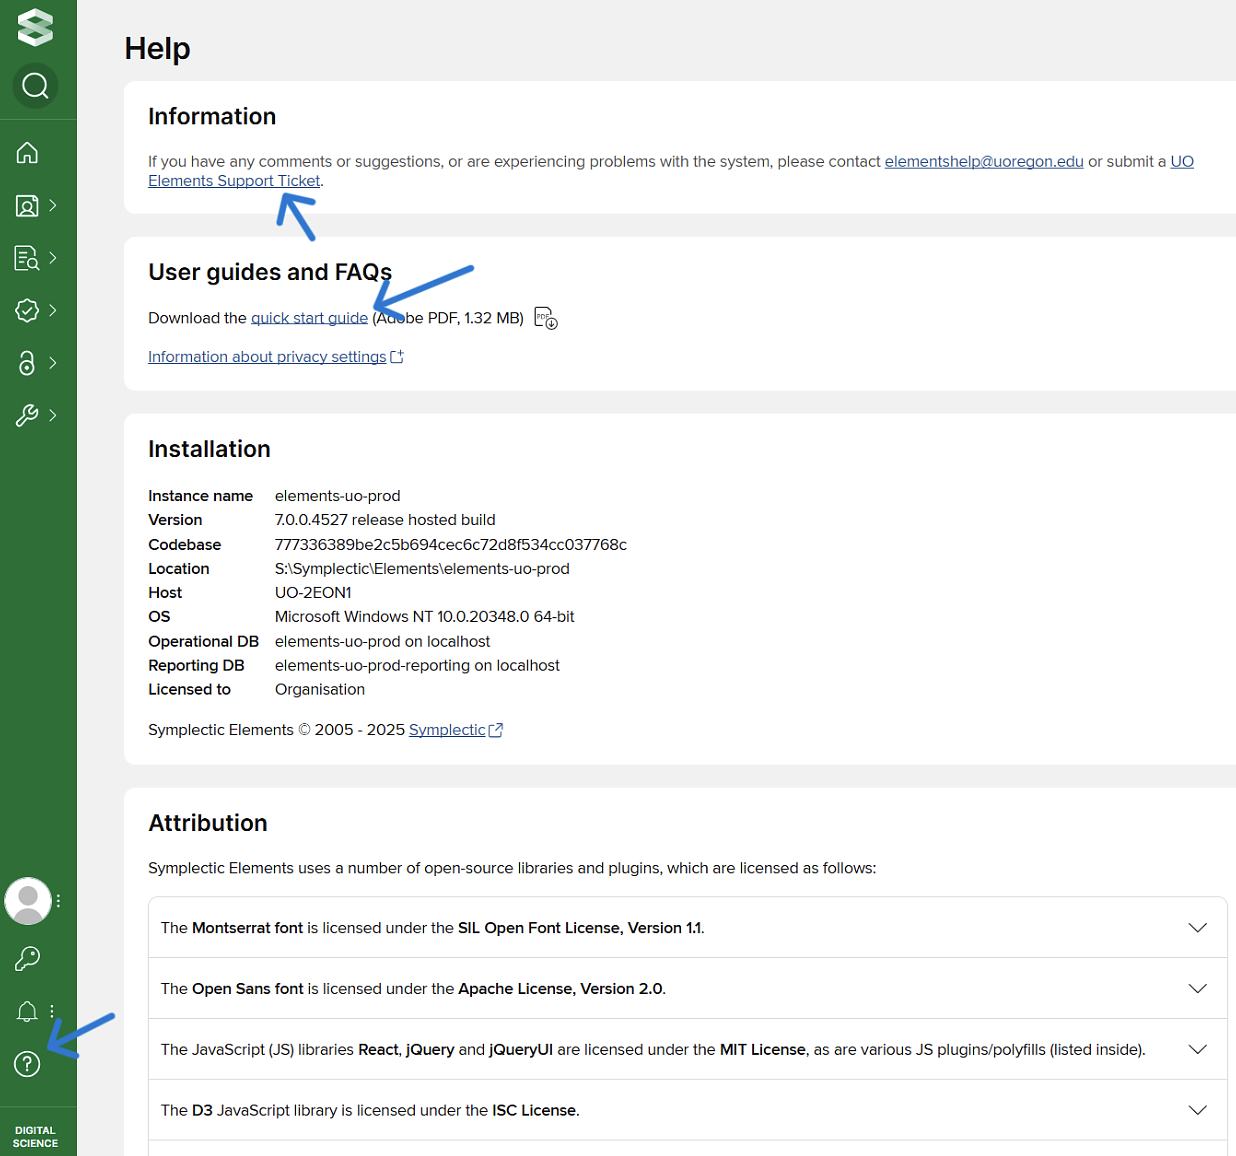
The Office of the Provost has created an Elements faculty support site for major reviews, where you will find an extensive library of guidance documents and videos, as well as a calendar for live trainings. You can also view a homepage tour below.
Want your profile to appear more professional?
- "Edit My Profile" > Upload a Photo > select your headshot (JPG and PNG files work best)
- Add your contact information at UO
- Fill out the "Overview" section with text. Highlight the core of your work.
- In each major section of your profile page, you can select the + button and add content. Share some highlights.
- Link your lab webpage or social media accounts.
- Set your preferred name and pronouns in "Account Settings" (Homepage > Edit Profile > Account Settings) (left hand menu > Account Settings or Set Preferred Name)
WATCH THE HOMEPAGE TOUR TUTORIAL VIDEO
Accuracy
Faculty can review and edit their own profiles including their activities, name variants, previous institutional work, and accomplishments. If there are issues with accuracy, faculty can submit a support request to the Office of the Provost team.
Elements Section | Data Source(s) | how to edit | Issues? |
|---|---|---|---|
Profile | Banner | Basic information is uneditable Can edit name variants, preferred name, pronouns, profile summary, email addresses, and previous insititutional work | |
Scholarly and Creative Activities | Harvested Third-Party Databases Research identifiers from Libraries CV transcription (OtP) | Editable See instructions on how to review and revise | |
Sponsored Project Activities | Harvested from Third-Party Databases Research identifiers from Libraries OVPRI grant proposal and award tracking system | Editable See instructions on how to review and revise | |
Teaching Activities | Registrar's Office data Clark Honors College data Division of Graduate Education data | Editable See instructions on how to review and revise | |
Service Activities | Senate committee records School/college/unit records CV transcribing (OtP) | Editable See instructions on how to review and revise | |
Review Exercise Dossier Content | Faculty provided | Faculty control the input of information and the addition of documentation to their dossier | Discuss with support staff or unit head if there are issues |
Privacy
UO uses numerous third party systems to conduct business operations (e.g., UO’s email, OneDrive and Sharepoint are all Microsoft services). As with Microsoft, our contract with Digital Science (the vendor that supplies Elements) includes protections against the vendor selling our data, or using it for purposes other than those we have contracted for. The contract has been vetted by Purchasing and Contracting Services, by the Provost’s Office, and by Information Services.
The default privacy setting for faculty information is "internal". Faculty can adjust this setting in their own profile for each activity or data point. UO does not use the public-facing module of Elements, called Discovery, so no information is shared externally. For major reviews, only committee members, eligible voting faculty, unit heads, supervisors, associate deans, deans, and other relevant executives are able to view or review their assigned faculty dossiers. See the United Academics CBA, school/college/unit process, and unit policy information for process details.
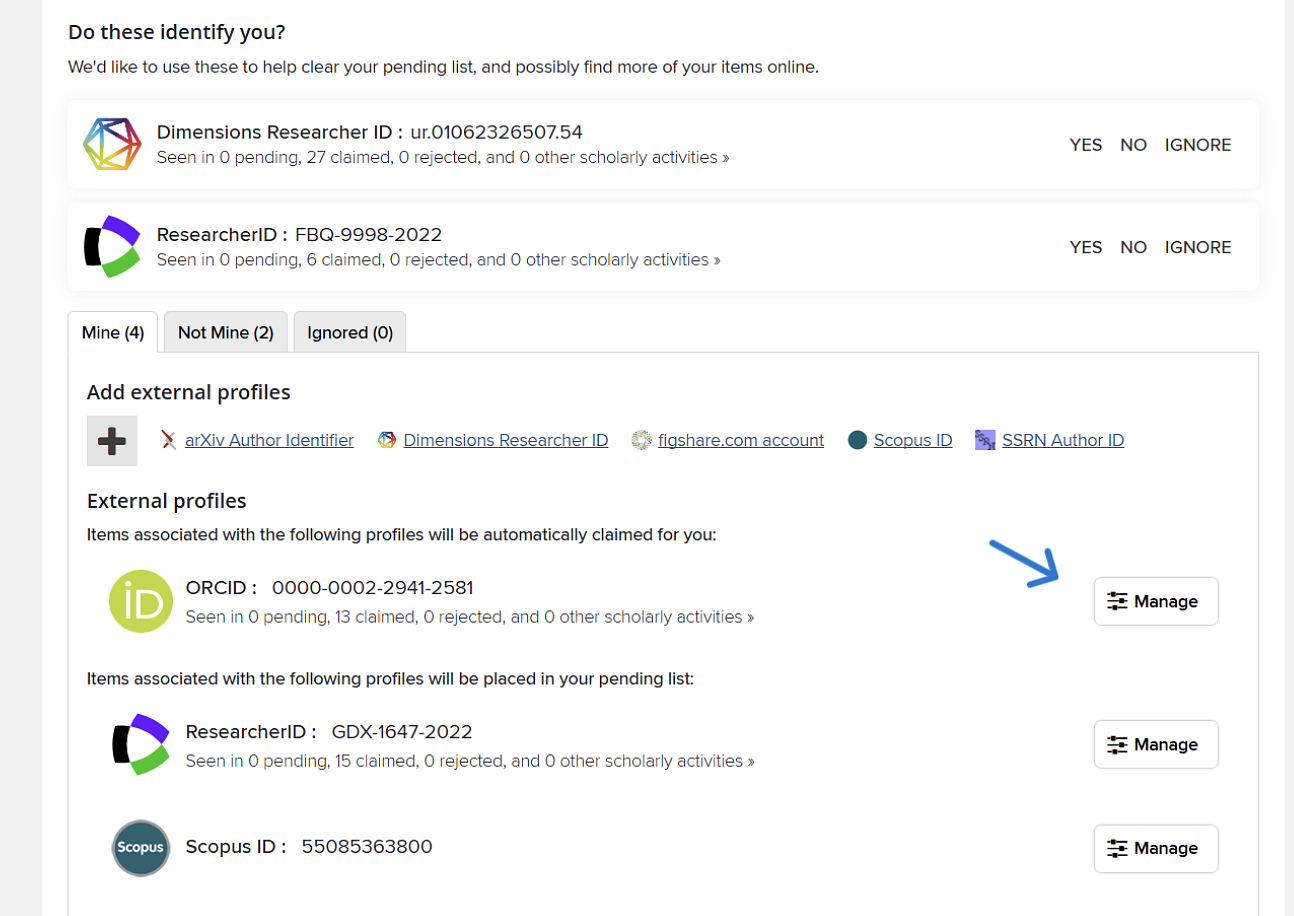
Elements use a range of researcher identifiers - including the arXiv Author Identifiers, Dimensions Researcher IDs, figshare.com accounts, ORCIDs, Web of Science ResearcherIDs, Scopus IDs, SSRN Author IDs and email addresses - to facilitate the claiming of publication and grant data. Note: UO does NOT have Figshare access so any Figshare information/IDs will not be recognized in the system.
Identifier-based searching improves document retrieval and greatly reduces the amount of time it takes for users and curators to process pending publications and grants.
Author identifiers
To begin, navigate to Profile & Work > Personal Profile & Identifiers > My Research Identifiers.
On the My Research Identifiers page, there may be a list of suggested author/researcher IDs under the "Do these identify you?" Section. Elements has harvested these identifiers from data sources based on search settings already in the system and an algorithm that looks for identifiers associated with harvested publications.
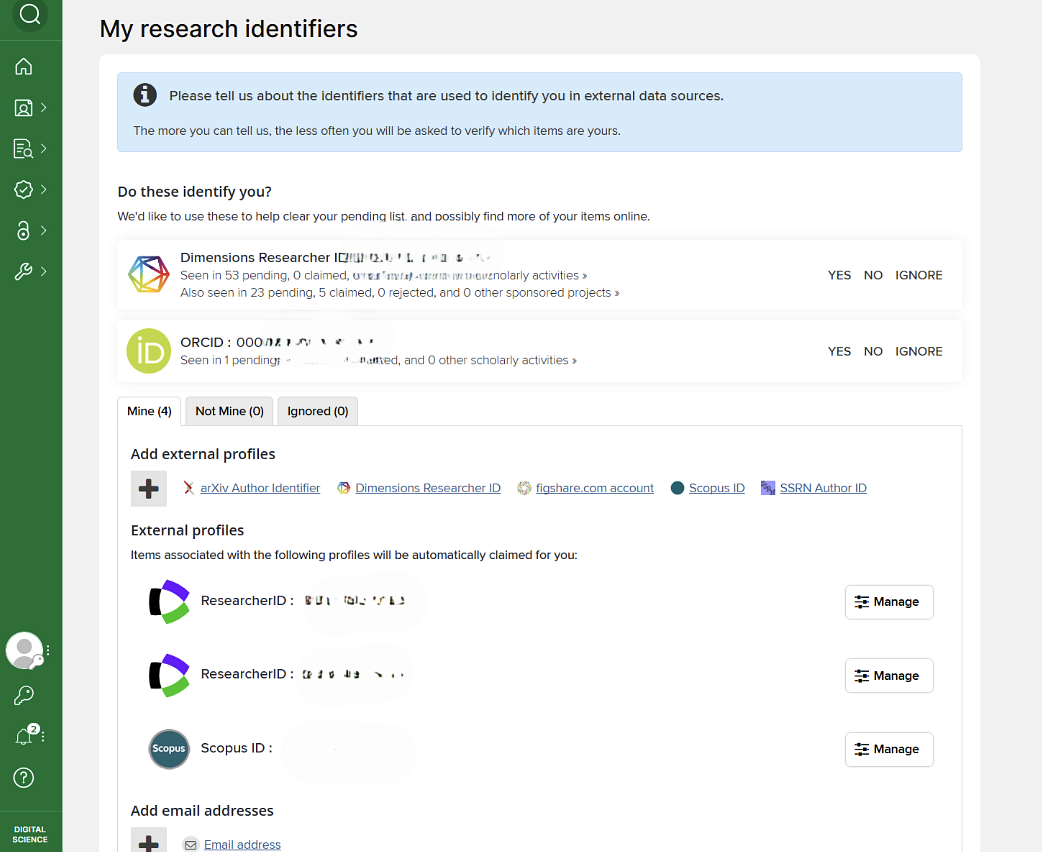
Click on the Yes, No or Ignore button beside each identifier to tell Elements what it should do when it finds this identifier in a publication. If unsure of a particular identifier, click on the identifier link to check the identifier profile at its data source.
Clicking the Yes button for an identifier will present a confirmation screen that explains exactly what will be done with the identifier if accepted.
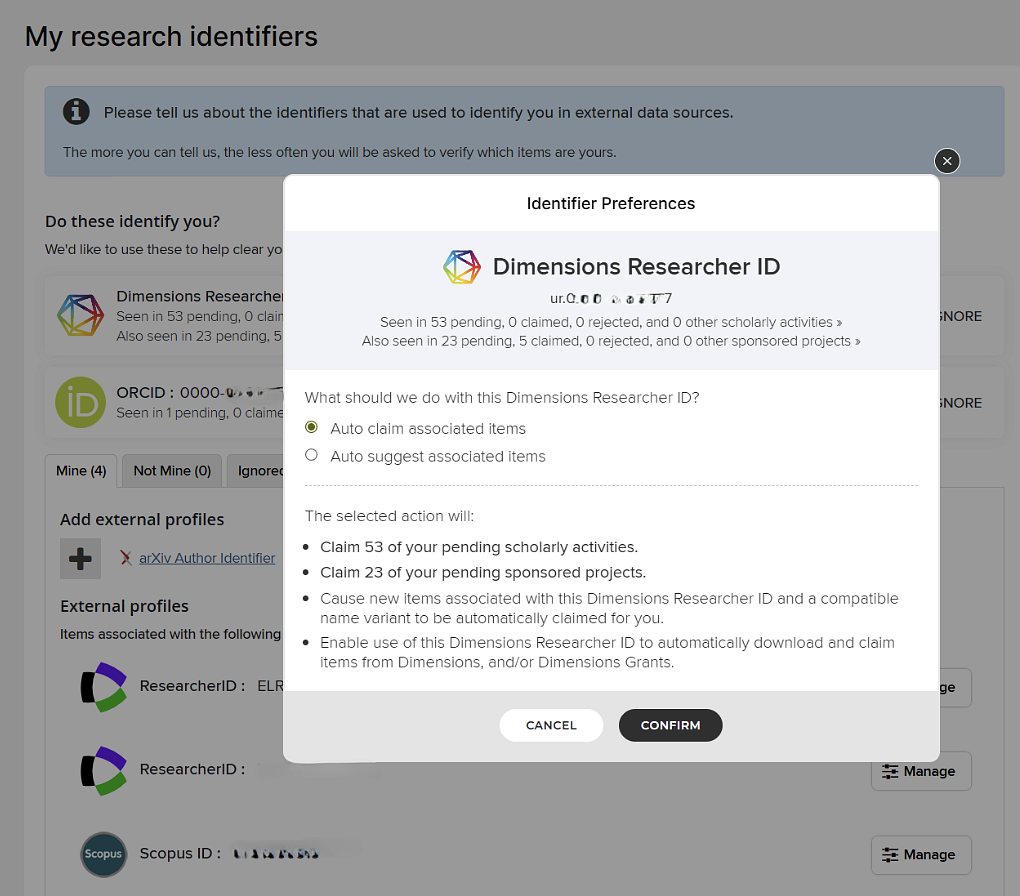
The default option is to "Auto claim items" which means publications or grants with the author identifier will be automatically added to the "Mine" list. The other option is to ask Elements to "Auto suggest items," which places the publications into the "Pending" list for you to review and claim or reject.
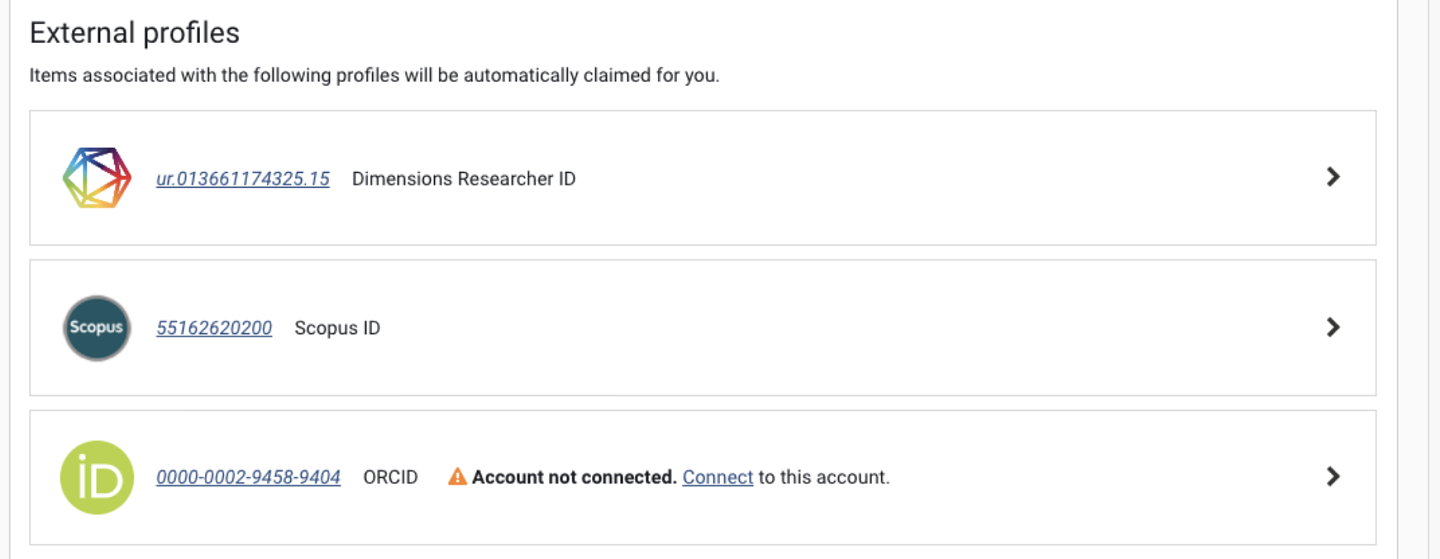
If claimed, the newly verified identifier will be added to the list of External profiles farther down the page.
If a known identifier is not listed in the suggestions, go the Add external profiles section and click on the database name.

This will open a dialogue box where the identifier can be entered.
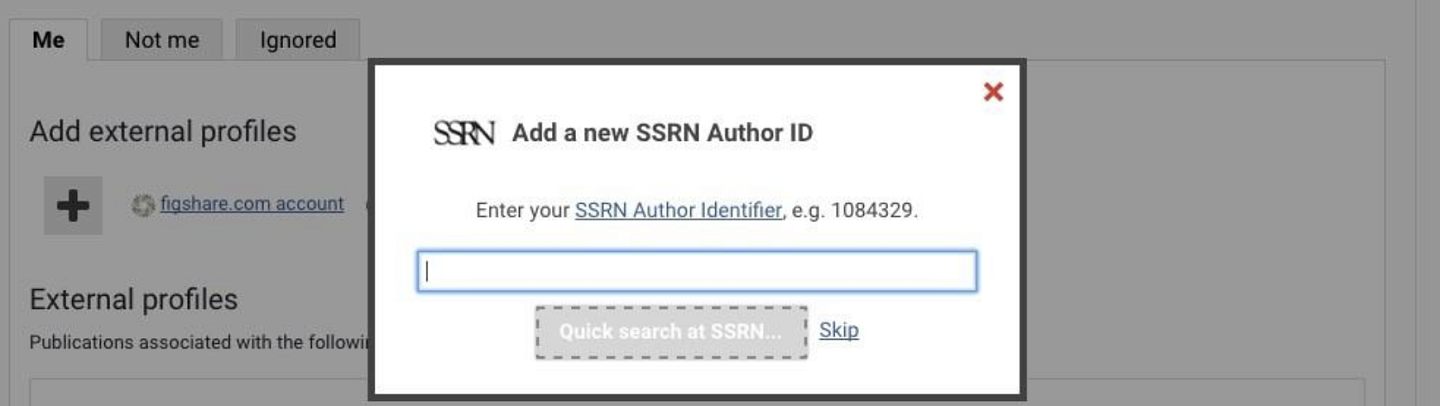
If the identifier is recognized, Elements will retrieve a sample set of articles from the database. Click the Verify button and Elements will retrieve all of the items associated with the identifier.
To manage or remove an identifier, click the "Manage” button on the right side of the page.
Multiple Researcher IDs and Profiles
Scopus and Web of Science will often create new profiles for faculty researchers and these will appear in Elements with the option for faculty to claim them. You can work with your subject librarian to get support/training/resources on how to clean up multiple profiles in these systems and the changes will be automatically reflected in Elements. You can also access UO Library's Digital Scholarly Identity support site.
Email Addresses
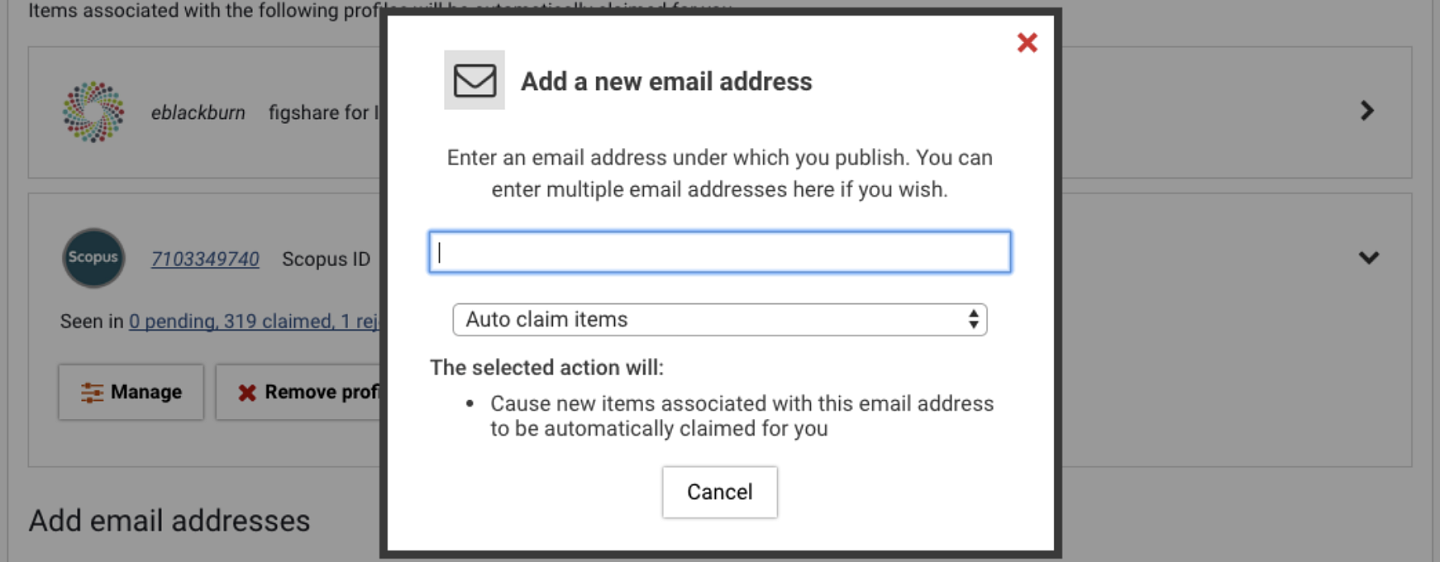
Email addresses can also be used to auto claim publications. The email address associated with an Elements account will be automatically added to the auto claiming system, but additional addresses can be entered. First, click the hypertext link under Add email addresses and then enter an email address.
Elements will also review the metadata in claimed publications and suggest other email addresses if others are found. As with publication identifiers, publications can be pushed into the "Mine" or "Pending" folders.
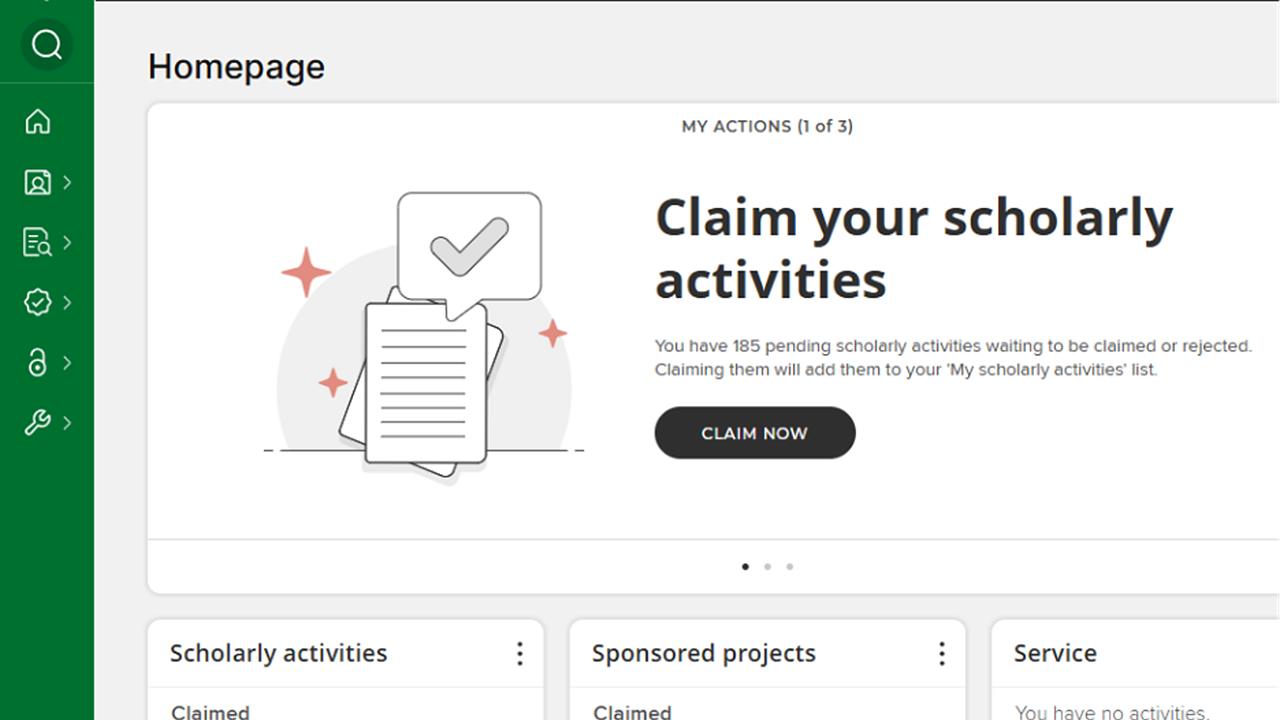
The To Do List (‘My Actions’) in Elements helps users complete important tasks such as adding an ORCID ID, setting up search settings, and linking scholarly activities to funding.
WATCH THE TO DO LIST TUTORIAL VIDEO
- Navigate to your homepage in the Elements system.
- Locate the 'My Actions' tab. This may appear as a list or a carousel. (You can toggle between carousel or list view by clicking on the three dots in the upper right).
- If in carousel mode, use the right arrow button to flip through the suggested actions.
- To add your ORCID ID, click the black 'Add' button in the center of the ORCID ID action card.
- To set up your search settings, click the 'View' button on the corresponding action card.
- To link your scholarly activities to your funding, click the black 'Link' button in the center of the action card.
- If you have any major reviews assigned or need to review someone’s dossier, these will also appear on the 'My Actions' page.
By checking and completing ‘My Actions’, faculty members can efficiently manage their responsibilities within the Elements system.
For major reviews, some faculty may be designated as REVIEWERS in Elements but other faculty may be designated as VIEWERS. Faculty with Reviewer assignments will have their assigned work show up in the My Actions section of Elements. Faculty with Viewer assignments will not see their assigned work in the My Actions section.
You can adjust your preferred name in Elements. A preferred name is one you are typically called by or one your prefer others use when communicating with you. This preferred name change will be reflected throughout the system but will not update UO records in Banner (speak to HR Operations for support on this matter).
- Homepage > click on Edit My Profile > find Account Settings (it's underlined and blue, top of the page near your profile details) and select > go to the Preferred Name section > click into each box for first/last name and adjust > select Update My Preferred Name. You can also use the left hand side menu. Hover over your profile icon > Set preferred name OR Account Settings.
You can add name variants in your Profile so that Elements will expand its search to pull in materials for the name variants. Name variants are iterations of your name, which may include middle name, middle initials, previous last name, etc. These activities will show up in “pending” for you to claim or reject. You can also delete name variants that do not match your profile (i.e. wrong initials) and may pull in scholarly activities that do not belong to you.
From Homepage, select Profile & work > Tools & Settings > Search Settings
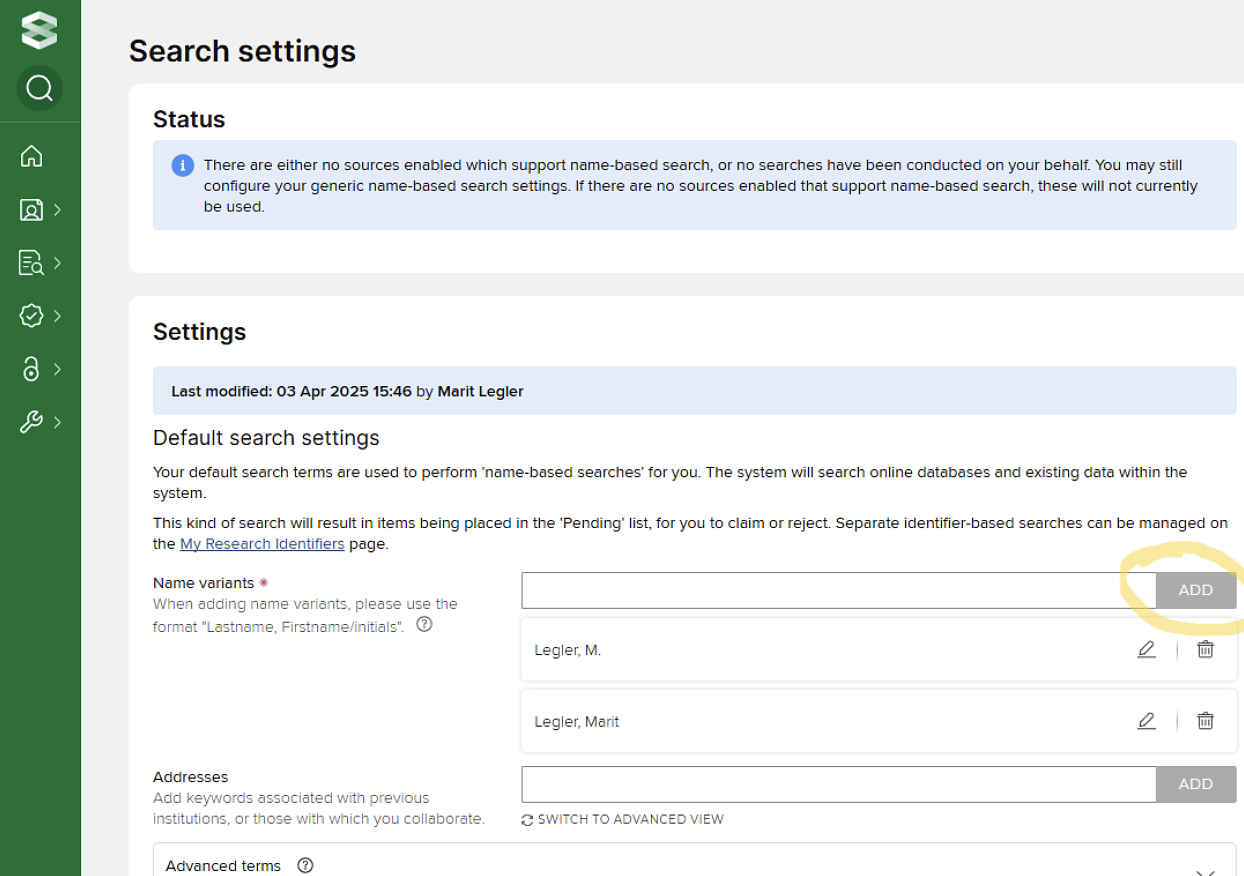
Be sure to SAVE at bottom of page!
Common Names
For those with common names (especially in a particular academic field or subfield), you can go into Search Settings and have Elements only run your researcher IDs and ignore your name. What does this do? Ignores your common name and only finds your ID-based scholarly activity on your behalf. This can eliminate a lot of bulk for faculty in their Pending scholarly activity section.
If you want to have Elements and its databases use your common name for searches, then ensure you include name variants, other email addresses, and other institutions your work can be tied to as it will make the system more accurate in its suggestions for your profile.